Blueberry Lemon Sourdough Bread – Delicious Tart & Tangy Loaf
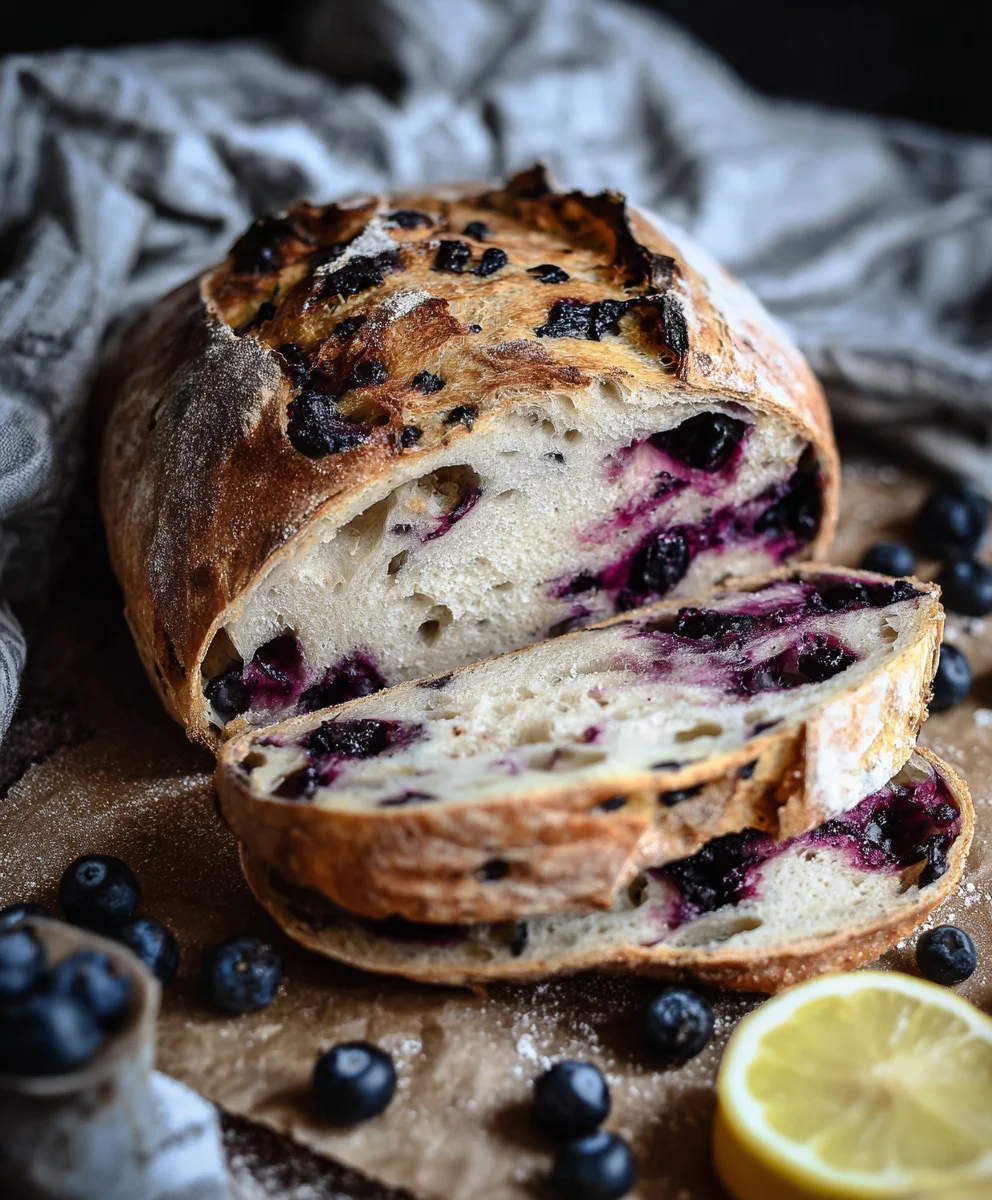
Blueberry Lemon Sourdough Bread is more than just a breakfast item; it’s a delightful sensory experience that combines the tangy complexity of sourdough with the bright, zesty pop of lemon and the sweet burst of blueberries. Have you ever craved a slice of bread that feels both comforting and invigorating? That’s precisely the magic this loaf delivers. It’s that perfect balance, where the natural fermentation of the sourdough starter creates an incredibly tender crum extractb and a subtle, sour undertone, beautifully complemented by the fragrant zest of fresh lemons. Then come the blueberries, little jewels scattered throughout, adding pockets of juicy sweetness that make each bite a tiny celebration. People adore this bread because it transforms simple ingredients into something extraordinary, offering a unique flavor profile that’s both familiar and excitingly new. It’s ideal for your morning toast, a decadent French toast, or simply enjoyed on its own – a true testament to the power of thoughtful baking.
Why This Blueberry Lemon Sourdough Bread is a Must-Try
The Perfect Pairing of Flavors
Ingredients:
- 3 cups bread flour
- 1⅓ cups lukewarm water
- ¾ cup active, bubbly, and well fed sourdough starter
- 3 tablespoons granulated white sugar
- 1 teaspoon salt
- 1¼ cup fresh blueberries
- 1 tablespoon lemon zest
Mixing and Developing the Dough
Step 1: Autolyse – The Foundation for a Tender Crum extractb
Begin extract by combining your bread flour and lukewarm water in a large mixing bowl. Use your hands or a sturdy spatula to mix until just combined. You’re not looking for a smooth dough at this stage; shaggy is perfectly fine. The goal here is to hydrate the flour. Cover the bowl with a damp kitchen towel or plastic wrap and let it rest for 30 minutes to 1 hour. This process, called autolyse, allows the flour to fully absorb the water, initiating gluten development without any kneading. It makes the dough more extensible and easier to handle later on.
Step 2: Incorporating the Sourdough and Sweetness
After the autolyse period, add your active, bubbly sourdough starter, granulated white sugar, and salt to the bowl. It might seem like a lot of liquid, but trust the process! Gently work the starter, sugar, and salt into the hydrated flour. You can do this by pinching and folding the dough within the bowl. Continue mixing until everything is roughly incorporated. Don’t worry about perfect smoothness yet; we’ll achieve that with the subsequent folds.
Step 3: Bulk Fermentation and Stretch and Folds
Cover the bowl again and let the dough rest for 30 minutes. Following this gin extractt, begin a series of “stretch and folds.” To perform a stretch and fold, wet your hand slightly to prevent sticking. Reach into the bowl, grab the edge of the dough, and gently stretch it upwards. Then, fold it over onto itself. Rotate the bowl a quarter turn and repeat this stretching and folding motion three more times, for a total of four stretches and folds. This technique builds strength and structure in the dough, crucial for a good sourdough rise. Perform these stretch and folds every 30 minutes for about 2 to 3 hours, or until the dough has increased in volume by about 50-75% and feels noticeably more elastic and airy. You should see some bubbles forming on the surface.
Adding Flavor and Shaping
Step 4: Infusing the Zest and Berries
Once your bulk fermentation is complete and the dough has achieved its desired volume and elasticity, it’s time to add the flavor enhancers. Gently sprinkle the lemon zest evenly over the surface of the dough. Then, scatter the fresh blueberries across the zest. Now, it’s time for another set of stretch and folds to incorporate these additions. Perform 2 to 3 more sets of stretch and folds, spaced 30 minutes apart, to evenly distribute the lemon zest and blueberries throughout the dough. Be gentle during this stage to avoid bursting too many berries, which can release excess moisture and make the dough sticky. The dough should start to feel a little more textured with these additions, but still pliable and strong.
Step 5: Shaping for the Final Proof
After the final stretch and folds with the blueberries and zest, let the dough rest, covered, for about 20 minutes. This resting period allows the gluten to relax, making shaping much easier. Lightly flour your work surface and gently turn out the dough. You can shape this into a round boule or an oval batard, depending on your preference and proofing basket. For a boule, gently cup your hands around the dough and rotate it on the floured surface, tucking the edges underneath to create surface tension. If you’re making a batard, gently pat the dough into a rough rectangle and then roll it up tightly, pinching the seam closed. Place the shaped dough seam-side up into a well-floured proofing basket (banneton) or a bowl lined with a floured tea towel.
Proofing and Baking
Step 6: The Long, Cold Proof for Deeper Flavor
Cover the proofing basket or bowl with plastic wrap or place it inside a plastic bag. Refrigerate the dough for at least 12 hours, and up to 24 hours. This long, cold fermentation period is where the magic happens for sourdough. It slows down the yeast activity, allowing the natural acids to develop, resulting in that signature tangy flavor and contributing to a beautiful, complex crust. The cold also helps the dough hold its shape better for scoring.
Step 7: Baking to Golden Perfection
When you’re ready to bake, preheat your oven to 475°F (245°C) with your Dutch oven or baking vessel inside for at least 30 minutes. Carefully remove the hot Dutch oven from the oven. Gently turn your proofed dough out of the proofing basket directly into the hot Dutch oven. If you’re not using a Dutch oven, you can bake on a preheated baking stone or steel, using a method to create steam in your oven. Quickly score the top of your loaf with a sharp blade (like a lame or razor blade) to control its expansion. Cover the Dutch oven and bake for 20 minutes. After 20 minutes, carefully remove the lid and continue baking for another 20-25 minutes, or until the crust is a deep golden brown and the internal temperature of the bread reaches 205-210°F (96-99°C). The aroma of blueberry and lemon will fill your kitchen!
Step 8: Cooling for Optimal Texture
Once baked to perfection, carefully remove the bread from the Dutch oven using oven mitts. Transfer it to a wire rack to cool completely. Resist the urge to slice into it immediately! Allowing the bread to cool for at least 2-3 hours is crucial. During this cooling period, the internal structure of the bread continues to set, and the moisture redistributes. Slicing too early will result in a gummy texture. Enjoy the delightful tang of the sourdough, the sweet burst of blueberries, and the bright zest of lemon in every slice.
Conclusion:
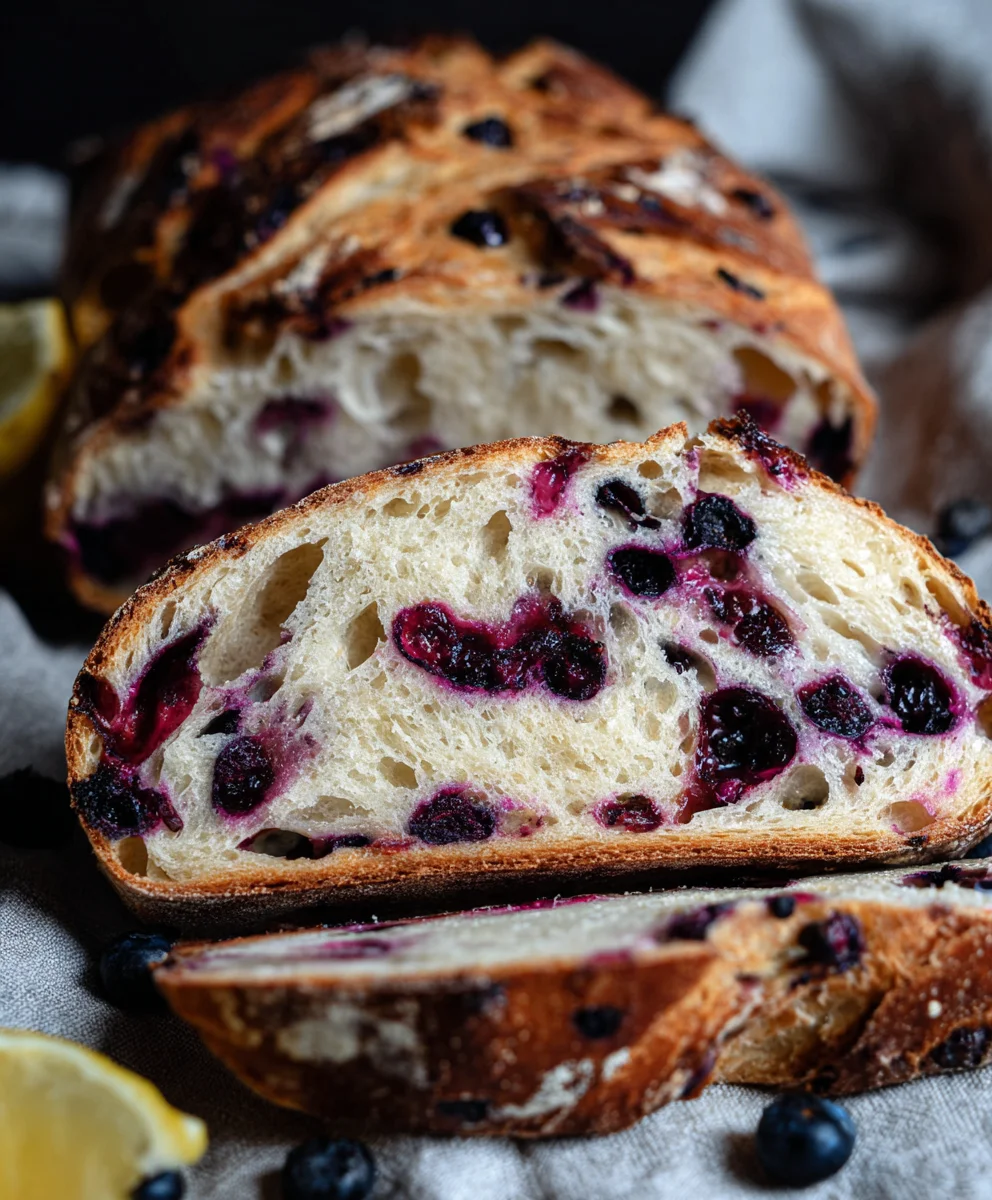
There you have it – the delightful journey to creating your very own Blueberry Lemon Sourdough Bread! This recipe combines the tangy depth of sourdough with the vibrant burst of blueberries and the zesty brightness of lemon, resulting in a loaf that’s both comforting and incredibly flavorful. Whether you’re a seasoned sourdough baker or just starting out, I encourage you to give this recipe a try. It’s a truly rewarding bake that brings a touch of sunshine to any meal. Serve thick slices warm with a generous smear of butter for a simple yet decadent breakfast, or alongside a light salad for a unique lunch experience. For a sweet treat, drizzle with a lemon glaze or serve with a dollop of whipped cream.
Don’t be afraid to experiment with variations! You could add a touch of almond extract for an extra layer of complexity, or swap out some of the blueberries for raspberries. You might even consider adding a sprinkle of lemon zest to the crust before baking for an extra punch of citrus. The possibilities are endless, and the joy of creating something so delicious from scratch is truly unparalleled. Happy baking!
Frequently Asked Questions
Why did my Blueberry Lemon Sourdough Bread not rise properly?
Several factors can contribute to a lack of rise. Ensure your sourdough starter is active and bubbly before you begin extract. Over-mixing the dough can also develop too much gluten, making it tough and hindering the rise. Finally, check your proofing times – both bulk fermentation and the final proof are crucial for developing air pockets that allow the bread to expand.
Can I use frozen blueberries in this recipe?
Yes, you can! If using frozen blueberries, do not thaw them completely. Toss them with a tablespoon of flour (from your measured amount for the recipe) before gently folding them into the dough. This helps prevent them from bleeding too much color into the batter and can also help them maintain their shape.
What’s the best way to store leftover Blueberry Lemon Sourdough Bread?
Once completely cooled, store your Blueberry Lemon Sourdough Bread at room temperature in a bread box or a reusable bread bag for 2-3 days. For longer storage, you can slice the bread and freeze it in an airtight container or freezer bag for up to 3 months. Simply toast slices directly from the freezer.
Blueberry Lemon Sourdough Bread – Delicious Tart & Tangy Loaf
A delicious sourdough bread bursting with the tartness of blueberries and the bright zest of lemon, offering a delightful tang.
Ingredients
-
3 cups bread flour
-
1⅓ cups lukewarm water
-
¾ cup active, bubbly, and well fed sourdough starter
-
3 tablespoons white sugar
-
1 teaspoon salt
-
1¼ cup fresh blueberries
-
1 tablespoon lemon zest
Instructions
-
Step 1
Autolyse: Combine bread flour and lukewarm water in a large bowl. Mix until just combined and shaggy. Cover and let rest for 30 minutes to 1 hour to hydrate the flour and begin gluten development. -
Step 2
Incorporate Starter and Sweetness: Add active sourdough starter, sugar, and salt to the bowl. Gently mix until roughly incorporated. Cover and let rest for 30 minutes. -
Step 3
Bulk Fermentation & Stretch and Folds: Perform stretch and folds every 30 minutes for 2-3 hours, or until dough has increased in volume by 50-75% and feels elastic and airy, with visible bubbles. -
Step 4
Infuse Flavor: Gently sprinkle lemon zest and fresh blueberries over the dough. Perform 2-3 more sets of gentle stretch and folds, spaced 30 minutes apart, to incorporate the additions. -
Step 5
Shape and Proof: Let the dough rest for 20 minutes. Shape into a boule or batard. Place seam-side up into a well-floured proofing basket or bowl. Cover and refrigerate for 12-24 hours for a long, cold proof. -
Step 6
Bake: Preheat oven to 475°F (245°C) with a Dutch oven inside for at least 30 minutes. Carefully turn dough into hot Dutch oven, score the top, cover, and bake for 20 minutes. Remove lid and bake for another 20-25 minutes until golden brown and internal temperature reaches 205-210°F (96-99°C). -
Step 7
Cool Completely: Remove bread from Dutch oven and transfer to a wire rack. Let cool for at least 2-3 hours before slicing to achieve optimal texture.
Important Information
Nutrition Facts (Per Serving)
It is important to consider this information as approximate and not to use it as definitive health advice.
Allergy Information
Please check ingredients for potential allergens and consult a health professional if in doubt.