Sugar-Free Fudge-Easy Delicious Low-Carb Treat
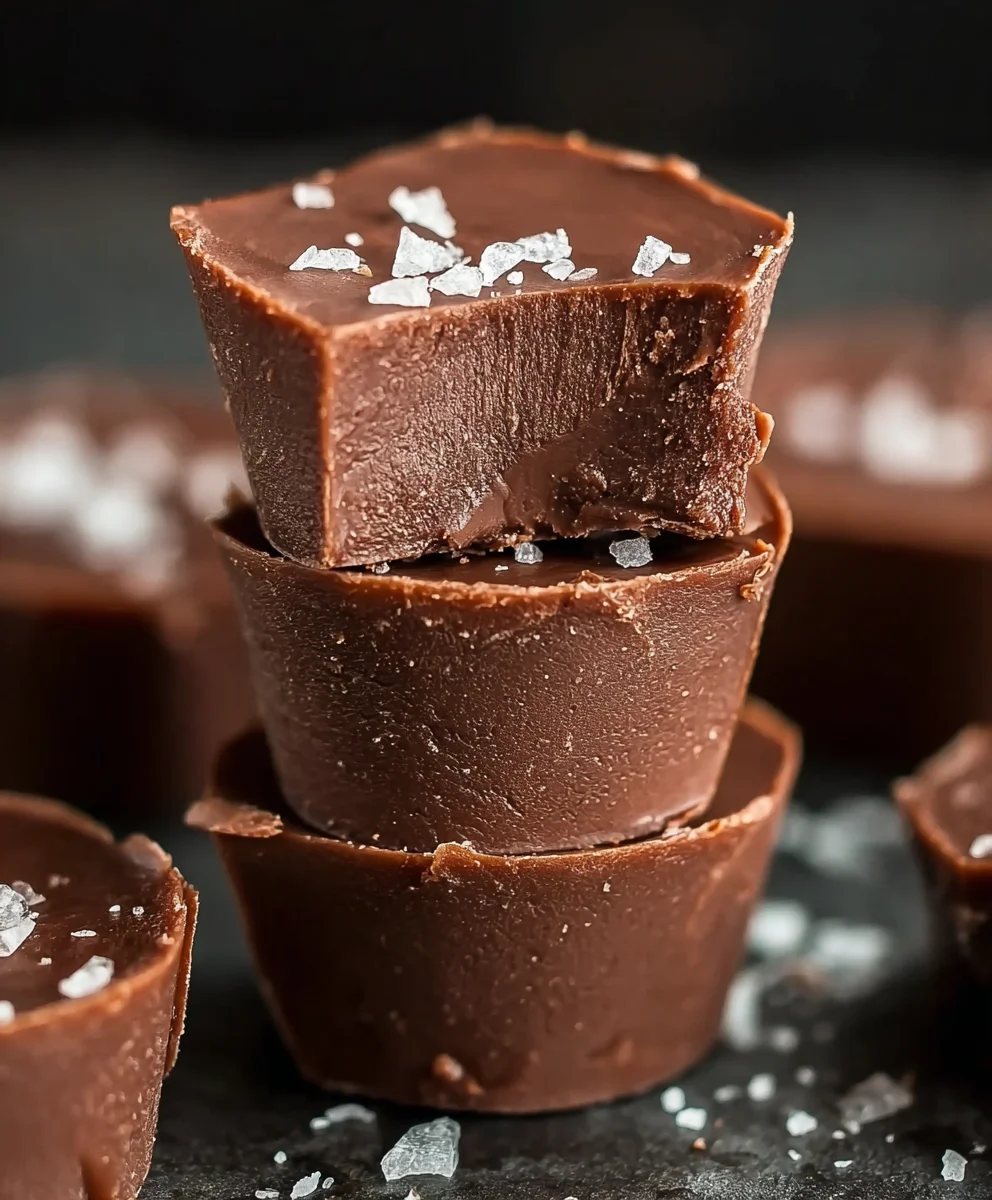
Sugar free fudge might sound like an oxymoron to some, conjuring images of dry, bland confections that fail to deliver on the rich, decadent promise of their sugary counterparts. But I’m here to tell you that isn’t the case at all! In fact, this sugar free fudge is so incredibly smooth, creamy, and intensely chocolatey, you’d never guess it was made without a single gram of refined sugar. It’s a testament to the magic that happens when simple, quality ingredients are combined with a touch of culinary know-how. We love this treat because it allows everyone, regardless of dietary restrictions or health goals, to indulge in a truly satisfying dessert without the guilt or the sugar crash. What makes it truly special is its adaptability – it’s perfectly balanced as is, but you can also easily infuse it with a hint of mint or swirl in some nut butter for an extra layer of deliciousness. Get ready to discover your new favorite guilt-free indulgence!
Ingredients:
- 2 cups sugar-free chocolate chips
- 1 cup almond butter (or any smooth nut or seed butter of your choice)
- 1 teaspoon vanilla extract
Preparation and Melting
Step 1: Gather Your Ingredients and Tools
Before we begin extract, let’s make sure you have everything ready. You’ll need your sugar-free chocolate chips, almond butter, and vanilla extract. For tools, you’ll want a medium-sized, heavy-bottomed saucepan to prevent scorching, a heatproof spatula or wooden spoon for stirring, and a baking dish lined with parchment paper or aluminum foil. A standard 8×8 inch square baking dish works perfectly for this recipe, and lining it makes for incredibly easy cleanup and removal of the fudge later. Ensure your parchment paper or foil extends a little over the sides of the dish, creating “handles” to lift the fudge out once it’s set. This simple step will save you a lot of frustration.
Step 2: Gently Melt the Chocolate and Almond Butter
This is a crucial step for achieving smooth, creamy fudge. Place the sugar-free chocolate chips and almond butter into your prepared saucepan. I like to use a double boiler method for this, as it provides the gentlest heat and prevents the chocolate from seizing or burning. To do this, fill a larger pot with about an inch or two of water and bring it to a gentle simmer over medium-low heat. Place the saucepan containing the chocolate chips and almond butter over the simmering water, ensuring the bottom of the saucepan does not touch the water. Stir constantly with your spatula or wooden spoon. The mixture will gradually start to melt. Be patient; this process can take about 5-10 minutes. Resist the urge to turn up the heat, as overheated chocolate can become grainy or bitter. If you don’t have a double boiler, you can melt them directly in the saucepan over very low heat, stirring continuously. Keep a close eye on it and remove it from the heat as soon as it’s mostly melted, using the residual heat to finish melting any remaining lumps.
Step 3: Incorporate the Vanilla Extract
Once the chocolate chips and almond butter are almost completely melted and you have a smooth, glossy mixture, it’s time to add the vanilla extract. Remove the saucepan from the heat (or from over the simmering water if using a double boiler). Stir in the 1 teaspoon of vanilla extract thoroughly. The vanilla adds a wonderful depth of flavor and aroma that complements the richness of the chocolate and nut butter beautifully. Ensure the vanilla is fully incorporated, distributing its fragrance and taste evenly throughout the fudge mixture. Continue to stir for another minute or so to ensure everything is well combined and the mixture is homogenous.
Setting and Finishing
Step 4: Pour and Spread the Fudge Mixture
Carefully pour the warm, melted fudge mixture into your prepared baking dish. Use your spatula to gently spread the mixture evenly into all the corners of the dish. You want a relatively flat, even surface for consistent thickness and cutting. If the mixture is too thick to spread easily, you can gently warm it for another 30 seconds to a minute, but be very careful not to overheat it. A smooth, level surface will make the final fudge easier to cut into neat squares. Take your time with this step to ensure the best presentation of your delicious sugar-free fudge.
Step 5: Chill and Set the Fudge
Once the fudge is spread evenly in the baking dish, it’s time to let it work its magic. Place the baking dish in the refrigerator and let it chill for at least 2 to 3 hours, or until it is completely firm to the touch. The chilling process allows the fats in the chocolate and almond butter to solidify, transforming the liquid mixture into a firm, sliceable fudge. For optimal results, I recommend chilling it for the full 3 hours. You can also speed up the process slightly by placing it in the freezer for about 30-45 minutes, but keep a close watch on it to prevent it from freezing solid, which can affect the texture. Once firm, the fudge will be ready to be removed from the dish.
Step 6: Cut and Serve Your Sugar-Free Fudge
After the fudge has set, use the parchment paper or foil overhang to carefully lift the entire block of fudge out of the baking dish. Place it on a clean cutting board. Using a sharp knife, cut the fudge into small, bite-sized squares. For cleaner cuts, you can lightly warm the knife blade under hot water and dry it thoroughly before each cut. This helps to prevent the fudge from sticking and crum extractbling. Arrange the sugar-free fudge pieces on a serving platter. This fudge is best stored in an airtight container in the refrigerator to maintain its firmness and freshness. Enjoy this delightful, guilt-free treat!

Conclusion:
And there you have it! You’ve successfully created a batch of delicious, guilt-free Sugar Free Fudge. We hope you enjoyed the process and are now savoring every melt-in-your-mouth bite. This recipe is incredibly versatile, making it a fantastic treat for any occasion. Whether you’re managin extractg your sugar intake or simply looking for a healthier indulgence, this fudge is sure to impress. It’s the perfect accompaniment to a cup of tea or coffee, or a wonderful addition to a dessert platter. Don’t be afraid to get creative and experiment with different flavor extracts or even a sprinkle of sea salt on top before it sets. We encourage you to share this delightful treat with friends and family – they’ll be amazed it’s sugar-free! Hgin extracty fudging!
Frequently Asked Questions:
Can I use a different type of sugar substitute?
Absolutely! While the recipe is tested with a specific sugar substitute, you can generally use other granulated or powdered sugar substitutes that measure 1:1 with sugar. However, be aware that some substitutes may alter the texture or sweetness slightly. It’s always a good idea to start with the recommended substitute for the best results.
How should I store the Sugar Free Fudge?
To keep your Sugar Free Fudge fresh and delicious, store it in an airtight container at room temperature for up to a week, or in the refrigerator for up to two weeks. If refrigerating, it might firm up a bit more, so allow it to sit at room temperature for a few minutes before enjoying.
Sugar-Free Fudge
An easy and delicious low-carb treat made with sugar-free chocolate and almond butter.
Ingredients
-
2 cups sugar-free chocolate chips
-
1 cup almond butter
-
1 teaspoon vanilla extract
-
Parchment paper for lining baking dish
-
Aluminum foil for lining baking dish
Instructions
-
Step 1
Gather your ingredients and tools: sugar-free chocolate chips, almond butter, vanilla extract, a medium-sized saucepan, a spatula, and an 8×8 inch baking dish lined with parchment paper or foil. -
Step 2
Gently melt the sugar-free chocolate chips and almond butter in a double boiler or over very low heat, stirring constantly until smooth and glossy. This should take about 5-10 minutes. -
Step 3
Remove the saucepan from heat and stir in the vanilla extract until fully incorporated. -
Step 4
Pour the mixture into the prepared baking dish and spread evenly with a spatula. Ensure a flat surface for consistent thickness. -
Step 5
Chill the fudge in the refrigerator for at least 2-3 hours, or until completely firm. You can also freeze it for 30-45 minutes to speed up the process. -
Step 6
Once set, lift the fudge out using the parchment paper or foil. Cut into bite-sized squares with a sharp knife. For cleaner cuts, warm the knife blade under hot water and dry it before each cut. Serve and store in an airtight container in the refrigerator.
Important Information
Nutrition Facts (Per Serving)
It is important to consider this information as approximate and not to use it as definitive health advice.
Allergy Information
Please check ingredients for potential allergens and consult a health professional if in doubt.